人的身体和机器一样需要保养。——佚名
SwiftLint
SwiftLint 是一个用于强制检查 Swift 代码风格和规定的一个工具,基本上以 Kodeco’s Swift 代码风格指南为基础。
SwiftLint Hook 了 Clang 和 SourceKit 从而能够使用 AST 来表示源代码文件的更多精确结果。

该项目遵守 贡献者契约行为守则。一旦参与,你将被视为支持这一守则。请将
不可接受的行为报告给 info@realm.io。
安装
使用Swift Package Manager
添加
1 | |
到你的 Package.swift 文件中,以自动获取 SwiftLint 的最新版本,或者将依赖项固定到特定版本:
1 | |
其中,用所需的最低版本或精确版本替换 <version>。
Xcode Package Dependency
使用以下链接将 SwiftLint 作为包依赖添加到 Xcode 项目中:
1 | |
使用 Homebrew:
1 | |
使用 CocoaPods:
将如下代码添加到你的 Podfile 即可:
1 | |
在下一次执行 pod install 时将会把 SwiftLint 的二进制文件和依赖下载到 Pods/ 目录下并且将允许你通过 ${PODS_ROOT}/SwiftLint/swiftlint 在 Script Build Phases 中调用 SwiftLint。
自从 SwiftLint 支持安装某个特定版本后,安装一个指定版本的 SwiftLint 是目前推荐的做法相比较于简单地选择最新版本安装的话(比如通过 Homebrew 安装的话)。
请注意这会将 SwiftLint 二进制文件、所依赖的二进制文件和 Swift 二进制库安装到 Pods/ 目录下,所以不推荐将此目录添加到版本控制系统(如 git)中进行跟踪。
使用 Mint:
1 | |
使用安装包:
你也可以通过从最新的 GitHub 发布地址下载 SwiftLint.pkg 然后执行的方式安装 SwiftLint。
编译源代码:
你也可以通过 clone SwiftLint 的 Git 仓库到本地然后执行
make install (Xcode 15.0+) 以从源代码构建及安装。
使用 Bazel
把这个放到你的 MODULE.bazel:
1 | |
或把它放到你的 WORKSPACE:
WORKSPACE
1 | |
然后你就可以在当前目录下使用这个命令运行 SwiftLint:
1 | |
用法
报告
我们鼓励你观看本次报告,来获得将 SwiftLint 整合到你的项目中的推荐方式的一个高层次概括:
Xcode
整合 SwiftLint 到 Xcode 体系中去从而可以使警告和错误显示到 IDE 上,只需要在 Xcode 中添加一个新的“Run Script Phase”并且包含如下代码即可:

Xcode 15 对 Build Settings 进行了重大更改,它将 ENABLE_USER_SCRIPT_SANDBOXING 的默认值从 NO 更改为 YES。
因此,SwiftLint 会遇到与缺少文件权限相关的错误,通常报错信息为:error: Sandbox: swiftlint(19427) deny(1) file-read-data.
要解决此问题,需要手动将 ENABLE_USER_SCRIPT_SANDBOXING 设置为 NO,以针对 SwiftLint 配置的特定目标。
如果你是在搭载 Apple 芯片的 Mac 上通过 Homebrew 安装的 SwiftLint,你可能会遇到这个警告:
warning: SwiftLint not installed, download from https://github.com/realm/SwiftLint
这是因为 Homebrew 在搭载 Apple 芯片的 Mac 上将二进制文件默认安装到了 /opt/homebrew/bin
下。如果要让 Xcode 知道 SwiftLint 在哪,你可以在 Build Phase 中将
/opt/homebrew/bin 路径添加到 PATH 环境变量
1 | |
或者,你可以创建一个指向在 /usr/local/bin 中实际二进制文件的符号链接:
1 | |
你可能希望将SwiftLint阶段直接移到’Compile Sources’
步骤之前,以便在编译之前快速检测错误。但是,SwiftLint 被设计
为在有效的 Swift 代码上运行,这些代码干净利落地完成了编译器的解析阶段。
因此,在’Compile Sources’之前运行 SwiftLint 可能会产生一些不正确的结果。
如果你也希望修正违规行为,你的脚本可以运行
swiftlint --fix && swiftlint 而不是 swiftlint。 这将意味着
修复所有可纠正的违规行为,同时确保在你的项目中对剩余的违规行为显示警告。
如果你已经通过 CocoaPods 安装了 SwiftLint,脚本看起来应该像这样:
1 | |
插件支持
SwiftLint 既可以作为 Xcode 项目构建工具,也可以作为 Swift package。
由于 Swift Package Manager 插件的限制,仅推荐
在其根目录中有 SwiftLint 配置的项目使用,因为
目前没有办法将任何附加选项传递给 SwiftLint 可执行文件。
Xcode
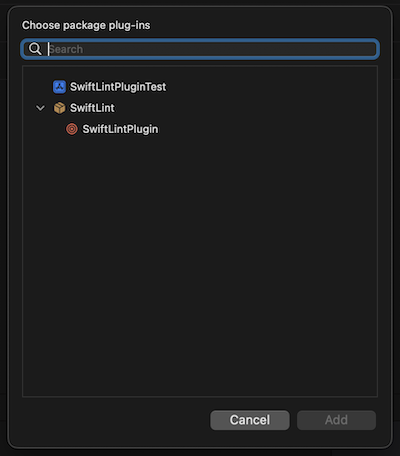
如果你正在使用 Xcode 中的项目,你可以将 SwiftLint 集成为
Xcode 构建工具插件。
将 SwiftLint 作为依赖包添加到你的项目中,无需链接任何其他服务。
选择要添加修正的目标,打开 Build Phases 检查器。
打开 Run Build Tool Plug-ins 并选择 + 按钮。
从列表中选择 SwiftLintBuildToolPlugin 并将其添加到项目中。

对于无人值守的使用场景(例如在 CI 上),可以通过以下方式禁用软件包和宏的验证对话框
- 单独将
-skipPackagePluginValidation和-skipMacroValidation传递到xcodebuild或者 - 为那个用户使用
defaults write com.apple.dt.Xcode IDESkipPackagePluginFingerprintValidatation -bool YES进行全局设置,然后写入defaults write com.apple.dt.Xcode IDESkipMacroFingerprintValidation -bool YES
注意:这将隐含地信任所有的Xcode软件包插件,并绕过Xcode的软件包验证对话框。
这对安全有影响。
Swift Package
你可以将 SwiftLint 集成为 Swift Package Manager 插件,如果你正在使用
具有 Package.swift 清单的 Swift 包。
将 SwiftLint 作为包依赖添加到你的 Package.swift 文件中。
使用plugins参数将SwiftLint添加到目标。
1 | |
Visual Studio Code
如果要在vscode上使用 SwiftLint,在应用市场上安装
vscode-swiftlint扩展。
fastlane
你可以用fastlane官方的SwiftLint功能来运行 SwiftLint 作为你的 Fastlane 程序的一部分。
1 | |
Docker
swiftlint 也可以在 Docker 上使用 Ubuntu 作为一个镜像使用。
因此,第一次你需要使用下面的命令调用 docker 镜像:
1 | |
接下来,你只需在 docker 中运行swiftlint:
1 | |
这将在你现在所在的文件夹(pwd)中执行swiftlint,显示类似的输出:
1 | |
这里有更多关于使用Docker 镜像的文档。
命令行
1 | |
在包含有需要执行代码分析的 Swift 源码文件的目录下执行 swiftlint 命令,会对目录进行递归查找。
当使用 lint 或者 autocorrect 命令时,你可以通过添加 --use-script-input-files 选项并且设置以下实例变量:SCRIPT_INPUT_FILE_COUNT 和
SCRIPT_INPUT_FILE_0, SCRIPT_INPUT_FILE_1… SCRIPT_INPUT_FILE_{SCRIPT_INPUT_FILE_COUNT - 1} 的方式来指定一个文件列表(就像被 Xcode 特别是 ExtraBuildPhase Xcode 插件修改的文件组成的列表,或者类似 Git 工作树中 git ls-files -m 命令显示的被修改的文件列表)。
也有类似的用来设置输入文件的环境变量以 自定义 Xcode script phases 。
使用多个 Swift 版本
SwiftLint 工作于 SourceKit 这一层,所以 Swift 版本发生变化时它也能继续工作!
这也是 SwiftLint 轻量化的原因,因为它不需要一个完整的 Swift 编译器,它只是与已经安装在你的电脑上的官方编译器进行通信。
你应该总是使用和你编译代码同样的工具集来执行 SwiftLint。
如果你有多套工具集或者安装了多个不同版本的 Xcode,你可能会需要覆盖 SwiftLint 默认的工具集。
下面这些命令可以控制 SwiftLint 使用哪一个 Swift 工具集来进行工作:
$XCODE_DEFAULT_TOOLCHAIN_OVERRIDE$TOOLCHAIN_DIR或者$TOOLCHAINSxcrun -find swift/Applications/Xcode.app/Contents/Developer/Toolchains/XcodeDefault.xctoolchain/Applications/Xcode-beta.app/Contents/Developer/Toolchains/XcodeDefault.xctoolchain~/Applications/Xcode.app/Contents/Developer/Toolchains/XcodeDefault.xctoolchain~/Applications/Xcode-beta.app/Contents/Developer/Toolchains/XcodeDefault.xctoolchain
sourcekitd.framework 默认需要位于 usr/lib/ 中,上面传入的路径的子目录中。
你可能也给反向 DNS 符号设置了 TOOLCHAINS 环境变量来标记一个特定的 Swift 工具集版本:
1 | |
在 Linux 上,SourceKit 默认需要位于 /usr/lib/libsourcekitdInProc.so 或者通过 LINUX_SOURCEKIT_LIB_PATH 环境变量进行指定。
预提交
SwiftLint 可以作为一个 预提交 钩子运行。
一当 安装,把这个添加到在 root 路径中的
.pre-commit-config.yaml 里:
1 | |
将 rev 调整为您选择的 SwiftLint 版本。可以使用 pre-commit autoupdate 来更新到当前版本。
SwiftLint 可以使用 entry 进行配置以应用修复和报错:
1 | |
规则
SwiftLint 已经包含了超过 200 条规则,并且我们希望 Swift 社区(就是你!)会在以后有更多的贡献,我们鼓励提交 Pull Requests。
你可以在 这里 找到规则的更新列表和更多信息。
你也可以查看 Source/SwiftLintBuiltInRules/Rules 目录来查看它们的实现。
Opt-In 规则
opt_in_rules 默认是关闭的(即,你需要在你的配置文件中明确地打开它们)。
什么时候需要将一个规则设为 opt-in 的指南:
- 一个可能会有许多负面作用的规则(例如
empty_count) - 一个过慢的规则
- 一个不通用或者仅在某些特定场景下可用的规则(例如
force_unwrapping)
在代码中关闭某个规则
可以通过在一个源文件中定义一个如下格式的注释来关闭某个规则:
// swiftlint:disable <rule1> [<rule2> <rule3>...]
在该文件结束之前或者在定义如下格式的匹配注释之前,这条规则都会被禁用:
// swiftlint:enable <rule1> [<rule2> <rule3>...]
例如:
1 | |
包含 "all "关键字将禁用所有的规则,直到 linter 看到匹配的启用注释:
// swiftlint:disable all
// swiftlint:enable all
例如:
1 | |
也可以通过添加:previous、:this或:next来修改disable或enable命令,
使它们只对前一行,当前或者后一行代码有效。
例如:
1 | |
执行 swiftlint rules 命令可以输出所有可用的规则和他们的标识符组成的列表。
配置
可以通过在你需要执行 SwiftLint 的目录下添加一个 .swiftlint.yml 文件的方式来配置 SwiftLint。可以被配置的参数有:
包含的规则:
disabled_rules: 关闭某些默认开启的规则。opt_in_rules: 一些规则是可选的。only_rules: 不可以和disabled_rules或者opt_in_rules并列。类似一个白名单,只有在这个列表中的规则才是开启的。
1 | |
定义自定义规则
你可以用如下语法在你的配置文件里定义基于正则表达式的自定义规则:
1 | |
输出大概可能是这个样子的:

你可以通过提供一个或者多个 match_kinds 的方式来对匹配进行筛选,它会将含有不包括在列表中的语法类型的匹配排除掉。这里有全部可用的语法类型:
- argument
- attribute.builtin
- attribute.id
- buildconfig.id
- buildconfig.keyword
- comment
- comment.mark
- comment.url
- doccomment
- doccomment.field
- identifier
- keyword
- number
- objectliteral
- parameter
- placeholder
- string
- string_interpolation_anchor
- typeidentifier
嵌套配置
SwiftLint 支持通过嵌套配置文件的方式来对代码分析过程进行更加细致的控制。
- 在你需要的目录引入
.swiftlint.yml。 - 在目录结构必要的地方引入额外的
.swiftlint.yml文件。 - 每个文件被检查时会使用在文件所在目录下的或者父目录的更深层目录下的配置文件。否则根配置文件将会生效。
excluded和included在嵌套结构中会被忽略。
自动更正
SwiftLint 可以自动修正某些错误,磁盘上的文件会被一个修正后的版本覆盖。
请确保在对文件执行 swiftlint autocorrect 之前有对它们做过备份,否则的话有可能导致重要数据的丢失。
因为在执行自动更正修改某个文件后很有可能导致之前生成的代码检查信息无效或者不正确,所以当在执行代码更正时标准的检查是无法使用的。
协议
关于

SwiftLint 是由 Realm Inc 建立和维护的。Realm 的名字和标志是属于 Realm Inc 的注册商标。
我们 ❤️ 开源软件!看一下我们的其他开源项目,瞅一眼我们的博客,或者在推特上跟我们唠唠嗑(@realm)。

感谢 MacStadium 为我们的性能测试提供了一台 Mac Mini。